social_stream
Social Stream
Consolidate your live social messaging streams
- Supports live automated two-way chat messaging with Facebook, Youtube, Twitch, and more
- Includes a “feature chat” overlay, selectable via the dockable dashboard
- Supports bot-commands and automated chat responses, with custom logic plugin support.
Social Stream makes use of VDO.Ninja’s data-transport API to stream data securely between browser windows with extremely low latency and all for free!


Supported sites:
- twitch.tv pop out chat
- youtube live pop out chat (studio or guest)
- facebook live (guest view on web)
- zoom.us (web version)
- owncast demo page (watch.owncast.online)
- crowdcast.io
- livestream.com
- mixcloud.com (pop out chat)
- discord.com (web version; toggle needed to enable)
- ms teams (experimental support)
- vimeo.com (pop out chat)
- instagram live (instagram.com/*/live/)
- tiktok live (tiktok.com/*/live)
- webex live chat (not the pop out)
- linkedin events comments
- vdo.ninja (pop-out chat)
- telegram (web.telegram.org in stream mode)
- restream.io chat supported (https://chat.restream.io/chat)
More on request
Video walk-thru
https://www.youtube.com/watch?v=X_11Np2JHNU
To install
This extension should work with Chromium-based browser on systems that support webRTC. This includes Chrome, Edge, and Brave.
Currently you must download, extract, and load the browser extension manually. It is not available yet in the browser’s web store.
Link to download: https://github.com/steveseguin/social_stream/archive/refs/heads/main.zip
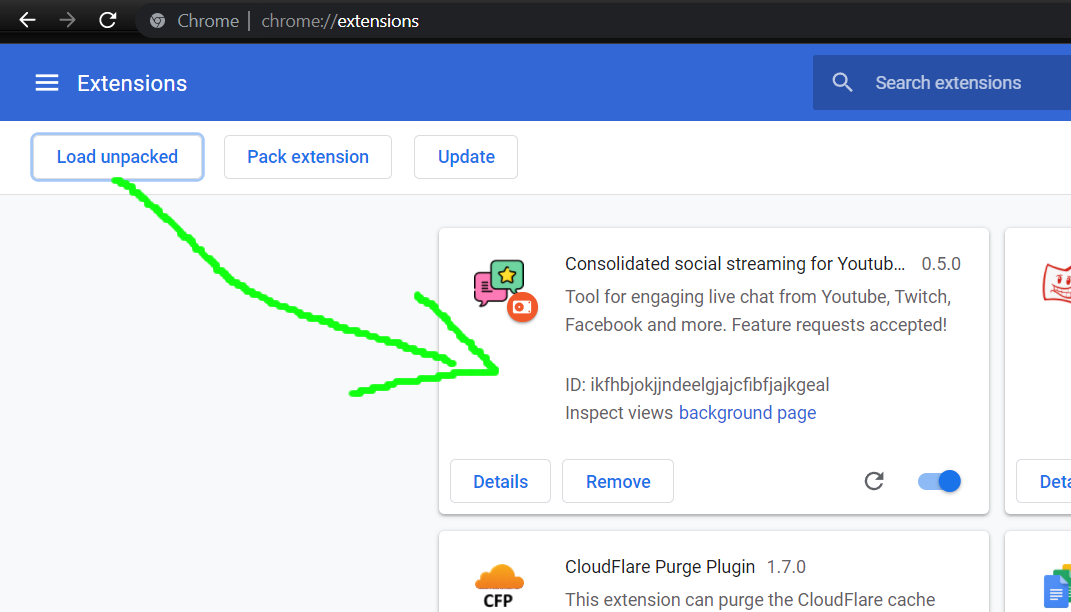
Once extracted into a folder, you can go here to load it: chrome://extensions/
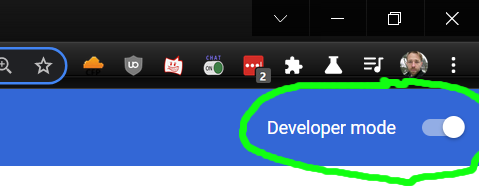
Ensure you have Developer Mode enabled; then you can just load the extension via the load unpacked button and selecting the folder you extracted the fiels to.
You’re ready to start using it!
Please note that you will need to manually update the extension to access newer versions; it currently does not auto update.
Firefox support
You have two ways to install the add-on for Firefox.
Please note, neither Firefox option supports two-way message responding, but the dock and featured chat overlay should work. If you want to use the bot commands with auto-responding, please consider using a Chromium-based browser instead.
First way:
Download+extract or clone the SocialStream code somewhere.
Go to about:debugging#/runtime/this-firefox in Firefox and select Load Temporary Add-on.
Select any file inside the SocialStream folder.
You’re done. This is a temporary install and none of the settings made will be persist, including your session ID.
You will still need to manually redo these steps to update when needed, but you can use the newest version of the code.
Second way:
Go to the release section of this repo and find a release that includes a Firefox XPI file.
https://github.com/steveseguin/social_stream/releases
Download the XPI file and drag it into an Open Firefox window.
Accept any install pop ups. Storage functions should work with this approach.
You are good to go, but you will need to manually update when needed by recompleting these steps.
Please note: XPI files are currently provided on request or with major updates; XPI file creation hasn’t yet been automated. (TODO)
To use
Open Twitch or Youtube “Pop out” chat; or just go to your Facebook Live chat while connected to Ethernet or WiFi. You must not minimize or close these windows, but they can be left in the background or moved to the side.
Then, press the Social Stream chrome extension button and ENABLE streaming of chat data. (Red implies disabled. Green is enabled)
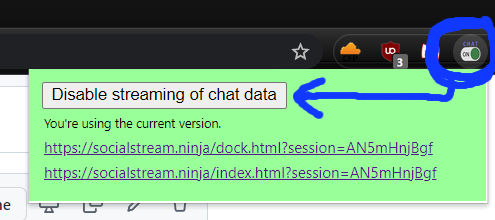
Please note: If the Extension’s icon is RED, then it means it is still off and wil not work. You have to click “Enable extension”, and the icon must change to the color green.
Next, using the provided two links, you can manage the social stream of chat messages and view selected chat messages as overlays.

You can hold ALT on the keyboard to resize elements in OBS, allowing you to crop the chat stream if you want to hide aspects like the time or source icon.
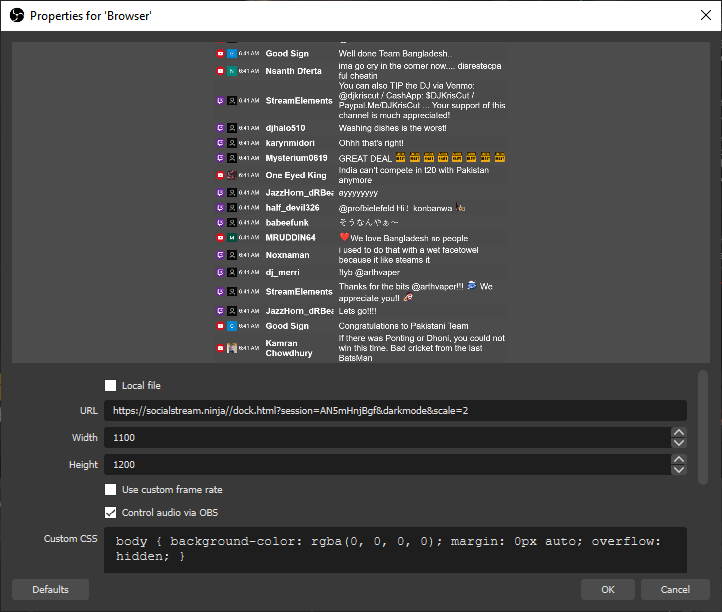
Clicking on a message will have it appear in the overlay link. You can press the clear button to hide it or use the &showtime=20000 URL option added to the overlay page to auto-hide it after 20-seconds (20,000 ms).

There is a &darkmode option, but the default is white, for the dock.
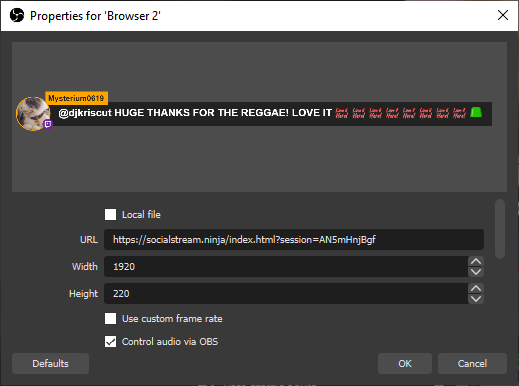
A good resolution for the overlay is either 1280x222 or 1920x220; you can specify this in the OBS browser source. You can edit the style of the overlay using the OBS CSS style input text box.
If using the automated chat response options, like auto-hi, you must ensure the Youtube/Twitch/Facebook chat input options are enabled and that you are able to send a chat message. Manually entering a chat message into the pop-out window or into the Facebook live chat area first can help ensure things are working are intended, else automated message may not be sent.
##### Note: If things do not work,
- Toggle the extension on and off, and reload the pop-out chat window. Ideally the pop-out chat should be visible on screen, as even just a few pixels shown will allow the pop-out chat to work at full-power. Chrome otherwise may throttle performance.
- Open a new dock / overlay link if things still do not work, as the session ID may have changed.
- Ensure that VDO.Ninja works with your browser, as if not, webRTC may be disabled and so this social stream extension will not work also.
- If using Facebook live chat, please sure you are viewing the page as a “viewer”, not as a publisher, and that you are connected to WiFi or Ethernet, and not mobile LTE/4G/5G.
- The auto-responder requires you to be signed in to the social endpoint and that you have access to chat; ensure you accept any disclaimer and try issuing a test message first.
Customize
There are quite a few toggles available to customize functions and styles, but these toggles often just apply URL parameters. You can as a result, just manually apply the parameters yourself, opening up more fine-grain control. A list of some of the options are available below.
To customize the dock, you can use the following options:
- &lightmode (Enables the dark-mode for the chat stream)
- &scale=2 (doubles size/resolution of all elements)
- ¬ime (hides the date in the chat stream)
- &hidesource (hides the youtube/twitch/fb icons from the stream)
- &compact (Removes the spacing between name and message)
- &autoshow (will auto-feature chat messages as they come into the dock at a rate of about 2 per 3 seconds)
To customize the featured chat overlay, the following URL parameters are available
- &showtime=20000 (auto-hides selected messages after 20s)
- &showsource (shows the youtube/twitch/fb icons next to the name)
- &fade (will have featured messages fade in, rather than pop up)
- &swipe (will have featured messages swipe in from the left side)
- ¢er (center featured messages)
To customize the color, font-size and styling, you can edit the CSS, in either the OBS browser source style-sheet section, or by editing the and using the index.html file. See below:
More advanced styling customizations
To further customize the appearance of the overlay or dock, you can make CSS style changes via OBS browser source, without any coding.
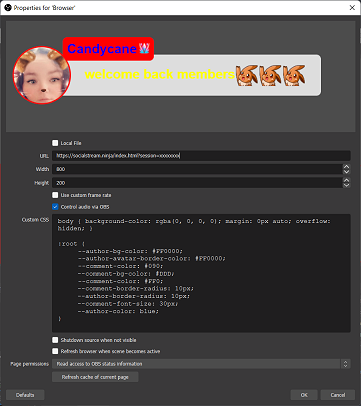
body { background-color: rgba(0, 0, 0, 0); margin: 0px auto; overflow: hidden; }

:root {
     --author-bg-color: #FF0000;
     --author-avatar-border-color: #FF0000;
     --comment-color: #090;
     --comment-bg-color: #DDD;
     --comment-color: #FF0;
     --comment-border-radius: 10px;
     --author-border-radius: 10px;
     --comment-font-size: 30px;
     --author-color: blue;
}
Sample CSS of which you can use to customize some of the basic styles. There’s not much that you can’t do via CSS in this way, but you can edit things further at a code-level if needed. Mac/Linux users may face issues with OBS not liking self-hosted versions of the index/dock file, but it’s not an issue for the PC version.
Auto responding / custom actions
You can create your own custom auto-responding triggers or other actions by including a custom.js file. You don’t need to host the index or dock file for this.
Included in the code is the custom_sample.js file, which you can rename to custom.js to get started. Included in it is the &auto1 trigger, which auto responds “1” to any message that is also “1”. You need to add &auto1 to the dock’s URL to activate it.
It’s fairly easy to modify the auto1 trigger to do whatever you want. You can also customize or removee the URL-parameter trigger needed to activate it.
Togglable Menu Commands
These are some generic auto-reply commands that can be toggled on/off via the extension’s menu. They do not need a custom.js file to work
- !joke (tells a random geeky dad joke)
- hi (Welcomes anyone who says “hi” into chat)
Hotkey (MIDI / Streamlabs) support
There’s a toggle to enable MIDI hotkey support. This allows a user to issue commands to the extension when active, such as issue predefined chat messages to all social destinations.
The hotkeys can be issued via MIDI, which can be applied to a Streamdeck also via a virtual MIDI device. The MIDI actions available currently include:
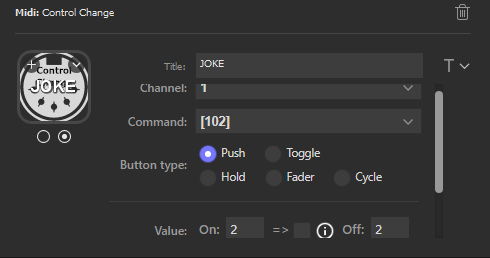
Using Control Change MIDI Commands, on channel 1:
- command 102, with value 1: Say “1” into all chats
- command 102, with value 2: Say “LUL” into all chats
- command 102, with value 3: Tell a random joke into all chats
- command 102, with value 4: Clear all featured chat overlays
The MIDI plugin can be found in the Streamdeck store pretty easily. If using Windows, you can find a virtual MIDI loopback device here: https://www.tobias-erichsen.de/software/loopmidi.html There are some for macOS as well.
Feedback welcomed
Known issues or solutions
If the auto responder doesn’t work – you see a blue bar, but nothing happens, there’s a couple things to do.
- make sure if using Youtube/Twitch that the pop out window is open
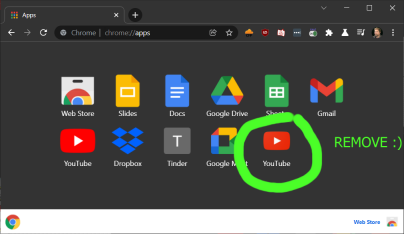
- go to
chrome://appsand remove the Youtube(s) apps that might appear. You can remove them all really if none are required. - Make sure you have permission to post into the chat first – sometimes you need to be a subscriber for example to send chat messages.
-
Try refreshing the chat page; sometimes refreshing the page will retrigger the code and bypass any errors. This is particularly try if you install or refresh the extension after the chat page has already been loaded.
-
Try to keep the chat window and dock page active and if possible, even partially visible on screen. If the windows are hidden or minimized, they may stop working. This is also true if the scroll bar for the chat window is not at the bottom; sometimes messages won’t load unless you are seeing the newest messages.
-
If using OBS Studio on macOS or Linux, for some reason this extension will not work if hosted locally on your drive, so custom CSS needs to happen via the browser source style section. It works great on PC locally, and when hosted on socialstream.ninja, but locally on mac, it does not seem supported. This is an issue you’ll need to take up with the OBS developers.
Support
You can find me on discord over at https://discord.vdo.ninja or https://discord.gg/7U4ERn9y , offering free support in channel #chat-overlay-support
Feedback and feature requests are welcomed
Icons
I do not claim rights of all the icons distributed. While I made some of the icons, trademarks and logos of third party companies/services are the rights of those respectivitive entities. Use them according to the terms that those entities may offer them under.
Credit
This project contains inspiration by my other project, chat.overlay.ninja, which was a derivation of another Youtube-specific chat widget, which was inspired by the stylings of other featured-chat code sample, of which that was also inspired by existing chat overlay designs. May the many new innovations of this project inspire the future foundation of other awesome projects as well.